
Access the MyPrint Dashboard: myprint.utas.edu.au
- Manage or cancel your print jobs
- Setup your mobile devices for printing
- View your personal print usage
Please Note: The MyPrint Dashboard is only available from within the University network.
Instructions and User Guides
Quick Start Guide
There are 3 Steps to get Started with MyPrint
- Set up the Print Queue
- Register your ID with a MyPrint Printer
- Manage MyPrint via your Personal Dashboard
1 SET UP THE PRINT QUEUE (Only Required if MyPrint Queue is Not Visible)
PLEASE NOTE: For 'Bring Your Own Device (BYOD)' please refer to 'Mobility Print' Instructions under 'User Guides'
- Make sure you are logged in to the University network or Eduroam and open file explorer.
- Hold down the Windows Key and press R to bring up the 'run window'; Alternatively click on the windows menu and type run and press enter
- In the input field type: \\myprintqueue.utas.edu.au\myprint and press enter.
- You should now see the MyPrint installation dialogue box.
- The MyPrint queue will now be installed on your computer.
PLEASE NOTE: On some devices a certificate notice will pop up. Please click 'accept' to continue the installation.
2 REGISTERING YOUR ID TO THE PRINTER
The first time you use MyPrint you need to complete the following steps to associate your ID with MyPrint. You only need to complete this once for your ID to be registered to all MyPrint printers.
- Swipe your ID on the Printer (Look for the sticker label / card reader on the printer showing where to swipe).
- Enter your UTAS network username and password.
- Press 'Log-in'.
- You should now be automatically logged in when you tap your ID on the machine.
PLEASE NOTE - Only use UTAS issued ID such as staff or student ID cards, print cards or building access card and fobs.
PLEASE NOTE - Complete the following steps if registration of your ID is not successful.
- If you attempted registration using your UTAS email address, try again instead using your Network Username.
- If you attempted registration using your Network user name, try again using your UTAS email address.
3 MANAGE MYPRINT VIA YOUR PERSONAL DASHBOARD
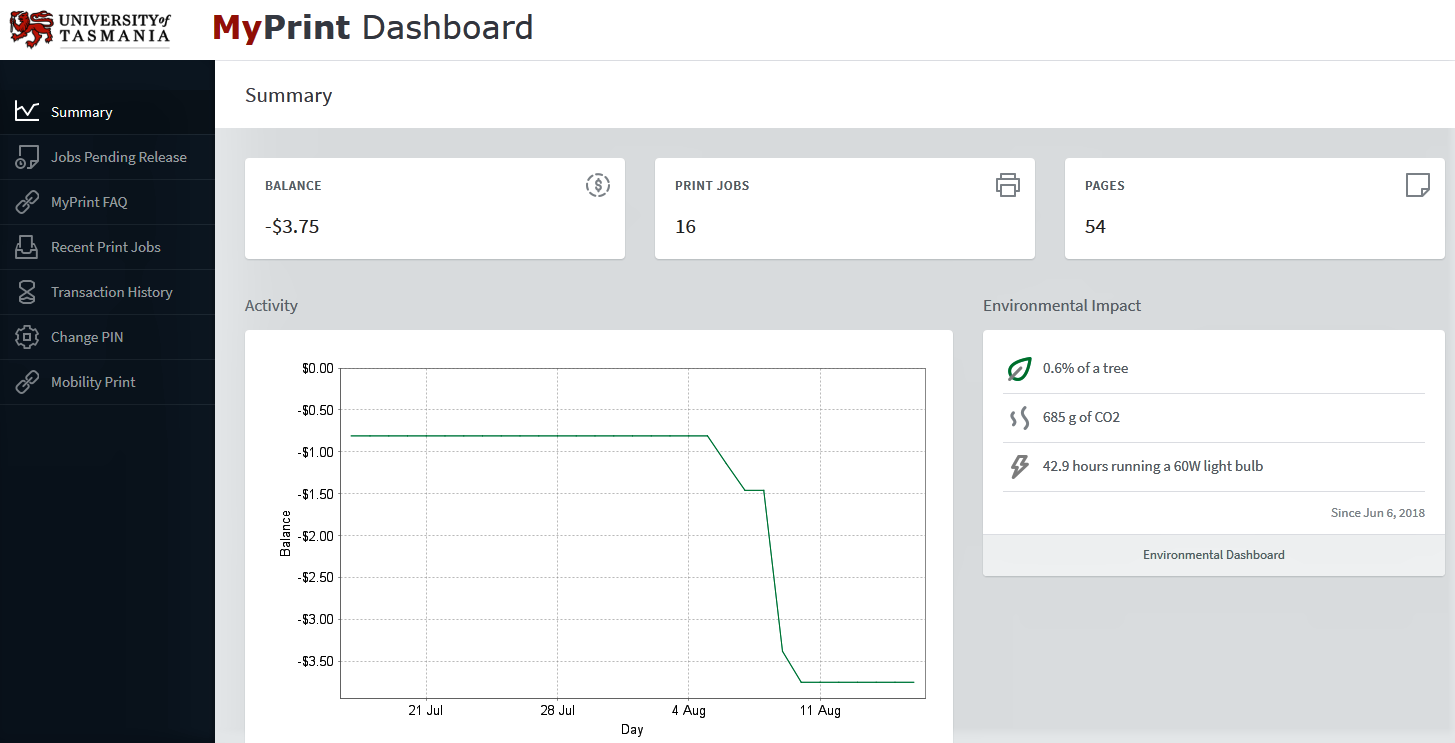
The MyPrint Dashboard allows students to access information about their print usage as well as manage their electronic purse.
To access your MyPrint Dashboard follow these instructions:
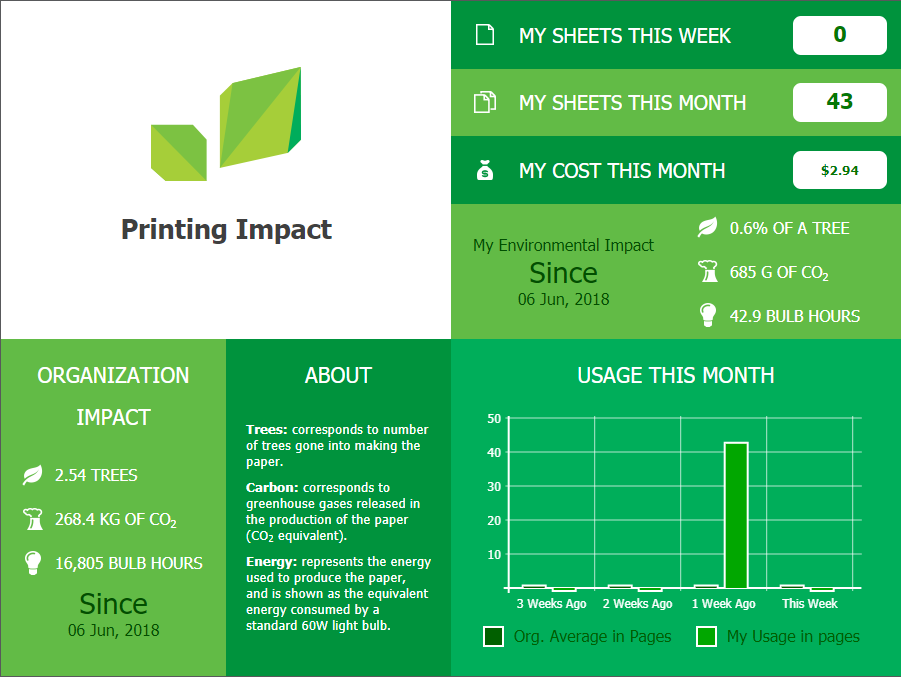
- For a more detailed view of the University's and your own personal environmental impact click on the 'Environmental Dashboard' in the 'Environmental Impact' section on the summary page (see example in the second image below).
- Open your web browser and navigate to myprint.utas.edu.au
- Enter your UTAS network username and password.
- Click 'Log-in'.
- You should now be logged in to your individual MyPrint Dashboard which looks similar to the image below.
Quick Start Guide
There are 3 Steps to get Started with MyPrint
- Set up the Print Queue
- Register your ID with a MyPrint Printer
- Manage MyPrint via your Personal Dashboard
1 SET UP THE PRINT QUEUE (Only Required if MyPrint Queue is Not Visible)
PLEASE NOTE: For 'Bring Your Own Device (BYOD)' please refer to 'Mobility Print' Instructions under 'User Guides'
- Make sure you are logged in to the University network or Eduroam and open file explorer.
- Open either Applications or click on the LaunchPad in the Dock, then open Self Service.
- Select Printing under the available options and click on Install under the MyPrint icon.
- The MyPrint queue will now be installed on your computer.
2 REGISTERING YOUR ID TO THE PRINTER
The first time you use MyPrint you need to complete the following steps to associate your ID with MyPrint. You only need to complete this once for your ID to be registered to all MyPrint printers.
- Swipe your ID on the Printer (Look for the sticker label / card reader on the printer showing where to swipe).
- Enter your UTAS network username and password.
- Press 'Log-in'.
- You should now be automatically logged in when you tap your ID on the machine.
PLEASE NOTE - Only use UTAS issued ID such as staff or student ID cards, print cards or building access card and fobs.
PLEASE NOTE - Complete the following steps if registration of your ID is not successful.
- If you attempted registration using your UTAS email address, try again instead using your Network Username.
- If you attempted registration using your Network user name, try again using your UTAS email address.
3 MANAGE MYPRINT VIA YOUR PERSONAL DASHBOARD
The MyPrint Dashboard allows students to access information about their print usage as well as manage their electronic purse.
To access your MyPrint Dashboard follow these instructions:
- Open your web browser and navigate to myprint.utas.edu.au
- Enter your UTAS network username and password.
- Click 'Log-in'.
- You should now be logged in to your individual MyPrint Dashboard which looks similar to the image below.
- For a more detailed view of the University's and your own personal environmental impact click on the 'Environmental Dashboard' in the 'Environmental Impact' section on the summary page (see example in the second image below)
Quick Start Guide
There are 3 Steps to get Started with MyPrint
- Set up the Print Queue
- Register your ID with a MyPrint Printer
- Manage MyPrint via your Personal Dashboard
1 SET UP THE PRINT QUEUE (Only Required if MyPrint Queue is Not Visible)
PLEASE NOTE: Linux support is limited and not guaranteed. Instructions are based off a Ubuntu installation and some steps may vary slightly depending on your installation of Linux. Fore more detailed instructions please refer to this user guide (PDF 643.9 KB)
In order to successfully install MyPrint on Linux devices you will need:
- A valid University of Tasmania Active Directory user login
- Administrator / root access to your operating system
- CUPS compatible printing utility for your operating system
- Users can install any required SAMBA and SMBclient packages
- Click on the following link to download the PPD file (PPD 213.5 KB) and copy the file to the following directory: '/usr/shares/cups/models/Toshiba'
- Open 'Printers' and click on 'Add'
- Select 'Enter URI' under 'Devices' and enter the following URI 'smb://myprintqueue.utas.edu.au/myprint'
- Select 'Provide PPD file' under 'Choose Driver' and open the file located in the directory from step 1 then click 'forward'
- Leave the default settings as displayed. Click 'forward' then 'apply' under 'printer description'
- You will now need to print a test page to authenticate your device to MyPrint using the following syntax:
username: utas\<username>
password: ***************
2 REGISTERING YOUR ID TO THE PRINTER
The first time you use MyPrint you need to complete the following steps to associate your ID with MyPrint. You only need to complete this once for your ID to be registered to all MyPrint printers.
- Swipe your ID on the Printer (Look for the sticker label / card reader on the printer showing where to swipe).
- Enter your UTAS network username and password.
- Press 'Log-in'.
- You should now be automatically logged in when you tap your ID on the machine.
PLEASE NOTE - Only use UTAS issued ID such as staff or student ID cards, print cards or building access card and fobs.
PLEASE NOTE - Complete the following steps if registration of your ID is not successful.
- If you attempted registration using your UTAS email address, try again instead using your Network Username.
- If you attempted registration using your Network user name, try again using your UTAS email address.
3 MANAGE MYPRINT VIA YOUR PERSONAL DASHBOARD
The MyPrint Dashboard allows students to access information about their print usage as well as manage their electronic purse.
To access your MyPrint Dashboard follow these instructions:
- Open your web browser and navigate to myprint.utas.edu.au
- Enter your UTAS network username and password.
- Click 'Log-in'.
- You should now be logged in to your individual MyPrint Dashboard which looks similar to the image below.
- For a more detailed view of the University's and your own personal environmental impact click on the 'Environmental Dashboard' in the 'Environmental Impact' section on the summary page (see example in the second image below)
This section contains user guides for the following functions:
- Scan to Email
- Scan to USB
- Photo Copy
- Mobility Print (BYOD printing including mobile and tablet devices)
Basic Functions
Release a Print Job
- Print your document ensuring you select the 'MyPrint' queue
- Present your ID on the ID reader on the printer to log-in
- Select 'Print Release'
- Select the print job you wish to print then select print.
- Select the arrow in the top right corner of the touch screen to log out of your account.
Scan to Email
- Present your ID on the ID reader on the printer to log-in
- Select ‘Scan’ on the touch screen
- Place your documents on the printer
- Touch the start option to begin scanning. The documents will be sent to your registered email address.
- Select the arrow in the top right corner of the touch screen to log out of your account.
WARNING: Scan to email functionality is only available for files up to 30 MB in size. For larger files, scan to USB.
Scan to USB
- Present your ID on the ID reader on the printer to log-in
- Select ‘Access Device’ on the touch screen
- Insert your USB storage device into the slot located in the left hand side of the touch screen
- Select ‘eBridge Plus for USB Storage’
- Place your documents on the printer
- Select scan then start
- Select the arrow in the top right corner of the touch screen to log out of your account.
Photocopy
- Select ‘Log out’ in the top right corner of the touch screen to log out of your account.
- Present your ID on the ID reader on the printer to log-in
- Select ‘Access Device’ on the touch screen
- Select copy
- Place your documents on the printer
- Press the green ‘start button’ on the printer (not on the touch screen to commence)
- Select the arrow in the top right corner of the touch screen to log out of your account.
Remote Control of Printing
With the MyPrint Dashboard it is possible to print or cancel print jobs remotely if required.
- Log in to your MyPrint Dashboard at myprint.utas.edu.au
- Navigate to 'Jobs Pending Release' on the left hand menu.
- Under 'Action' select either [print] or [cancel] for the corresponding print job you wish to action.
- If your print job is not visible, click on the 'refresh now' link on the right hand side of the jobs pending release page.
- If you select [print] a list of university printers will be displayed for you to choose from. Select the printer you wish to print to noting the campus, building and room numbers included in the name.
WARNING: This will immediately release your print job. Ensure you have chosen the correct printer and remember to collect your prints from the machine.
Mobility Print
- Mobility Print simplifies the printing process for bring your own devices (BYOD) and other end-user managed devices such as smartphones, tablets, laptops or Chromebooks.
- By following a few simple steps, users can quickly discover and print to any MyPrint printer when connected to Eduroam or on the University Network.
How to access Mobility Print
- Navigate to your MyPrint Dashboard myprint.utas.edu.au and log in with your UTAS network username and password.
- Navigate to the Mobility Print Option on the left hand menu.
- Select your operating system from the left hand menu and follow the instructions.
Mobility Print Instructional Videos
How to print from a Windows device
How to print from a MacOS device
How to print from an iOS device
Accessing Support
If you can't resolve your issue by following any of the below trouble shooting guides or FAQ's please contact our managed print service provider, WINC:
WINC Support
T: 1300 136 538
E: tas.mps@winc.com.au
MyPrint has stopped working on my MAC
If you have recently changed your University password this may not have updated your MyPrint credentials correctly.
- Navigate to the 'Keychain Access' tool via either the 'Spotlight Search' function or the 'Launch Pad'.
- Locate MyPrint from the Key Chain list and delete it. This will force a reset of your MyPrint password.
- Return to your document and follow the usual process to print. You will be prompted to re-enter your University username and password
Please Note: Ensure that the username populated is your University username as in some cases it will default to the MAC user name.
ID is not associating with printer
- The reader on the printer is very sensitive. If you have other compatible ID in close proximity (such as in your wallet) the registration process may re-start if the printer has picked up the incorrect ID.
- Alternatively, if this is your first time registering the ID it may indicate that your ID is not compatible.
Log-in credentials are not registering ID to printer
- If you have entered your UTAS email address as the log-in, try entering your network log-in name instead.
- Alternatively, if you have tried initially with your network log-in, log in with your UTAS email address.
I have printed to the MyPrint Queue but the printer doesn't have the 'ID Reader'
- If you wish to cancel your print job this can be done via the MyPrint dashboard. Alternatively it will expire after eight hours and be deleted from the system.
- It is likely that MyPrint has not been rolled out in your current location. Please refer to the Roll out Schedule under the Project and Timeline FAQ's menu.
Frequently Asked Questions
What is MyPrint?
- MyPrint is the name of the University of Tasmania’s Managed Print Service. A 'Managed Print Service' is a program offered by print providers that manage all aspects of business printing devices, including printers, scanners, faxes and copiers including the machines, software, support and consumables.
- By optimizing these devices, businesses save money, produce less waste and increase efficiency.
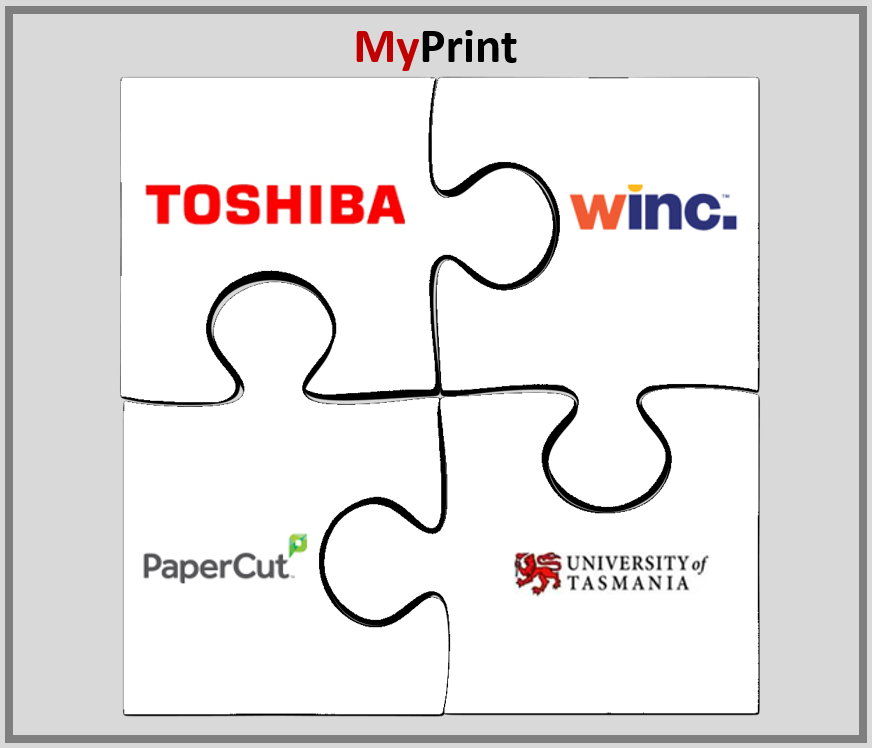
- The MyPrint Solution comprises of the following four components:
- New Toshiba Print Hardware.
- End to end managed print service provided by WINC.
- Print Management Software and billing reports from Papercut.
- Supported by a new print policy and billing reconciliation process from the University of Tasmania.
What are the benefits?
- Optimised machines tailored to our usage needs will be more efficient and consistent with our carbon footprint policy.
- Improved student printing experience (including an improved electronic purse for managing credit).
- Improved document security when printing.
- Proactive support model (which includes automated toner replacement).
- Visibility of printer usage on many levels (which can be fully customised to reporting requirements).
- Better quality and more reliable printing.
- Ability to easily print to any printer at any time.
- Consolidation of multiple vendor contracts, models of printers and support arrangements will result in a reduction of cost.
What is Papercut?
- Papercut is the application that gives you visibility and the information to manage how much you are printing and the cost of printing from an individual level to across the University. It also provides some great reporting that can be used to help manage our carbon footprint as well as costs.
- All staff and students will have a personalised Papercut dashboard they can log into.
- For Students this will show their current balance and allow them to manage their account.
Why do we need such detailed information about our printing?
- Rather than monitoring individual printing habits this is more aimed at functional business areas across the University and allowing management who are accountable for printing budgets the information they need to plan for and manage their printing usage. Detailed reporting provides managers with the information they need to be able to do this.
- Visibility of usage can also prompt an opportunity for service improvements from our service provider WINC.
- Going forward we will also be able to view our University wide printing habits and work together as an organisation to lower our carbon footprint.
How will we be disposing of the old printers in a sustainable way?
- Charity – As a first priority we will look to donate working printers to others in need.
- Sale - If sensible and appropriate we may choose to sell some devices.
- Sustainable disposal – e-waste disposal consistent with our current e-waste practices where we either on sell or break down of raw materials.
What are we going to do about wiping all the data?
- The legacy printers are cleared after 24 hours – no data is kept on these printers. In terms of any settings within these printers they will be cleared sustainably in accordance to the relevant policies.
- Moving forward as the new printers will be released with the FollowMe application this will allow you to print anywhere at any time but it is secured by your log in or ID swipe card (these are also to be released).
What is the brand of printers we will be using?
- Toshiba.
How will I order consumables for the printers in my area once the changes are made?
- Paper will be ordered the same way you currently order it via PurchaseNow
- Toner will be automatically sent as part of the service from WINC without the need for ordering. The printer proactively notifies WINC once toner is running low and the replacement is automatically sent.
Do WINC have experience dealing with an organisation on the scale of UTAS?
- Yes. WINC are a national company and service many large organisations including other universities.
How does costing/pricing structure work for printers?
- The University is no longer purchasing printers. The MyPrint service model is an end to end solution where the machines are owned by the managed service provider WINC. WINC also provide all support and maintenance as part of this model.
- Details about the costing structure for staff printing costs are still being developed.
- The costing structure for students is 8c per page for A4 in black and white and 24c for colour. A3 is double the price for each. This is a significant reduction from current printing costs.
How is photocopying Charged?
- Photocopying is charged at the same price as printing.
Is there charging for scanning?
- No, there is no charge for scanning.
How does the costing/pricing structure work for toner?
- Toner and consumables other than paper are all included in the price of printing.
- Toner and consumables other than paper no longer need to be purchased by individual areas as they are all part of the managed service.
How does the costing/pricing structure work for paper?
- Paper will continue to be purchased via usual processes in PurchaseNow.
How does the costing/pricing structure work if I need to print for other people or projects etc.?
- We are currently working on a solution to be confirmed.
PLEASE NOTE - Only use UTAS issued ID such as staff or student ID cards, print cards or building access card and fobs.
Do I require ID to use the printer?
- ID is not required to access printing however it will make using the print solution much easier for you as an alternative to entering your network username and password on the machine.
Is my existing ID compatible?
- We believe that most existing security cards and Fobs are compatible however if not we will be issuing temporary cards as part of the printer roll-out.
- Alternatively new cards can be obtained by following existing processes.
PLEASE NOTE: Staff ID with only a magnetic stripe will not work with MyPrint Printers
Will my ID still work if it has expired?
- If it is a compatible card it will still work even if it has expired.
What happens if I don’t release my print job?
- Print jobs will be stored in the MyPrint queue for 8 hours. After this time they will be permanently deleted and will need to be printed again should you wish to complete the print job.
How is MyPrint different from current printing arrangements?
- Previously to print to a specific printer you would have had to locate that printer in the directory and ensure it was the correct machine before printing. This process would need to be repeated every time you needed to use a different printer.
- With the new solution there is one single print queue to select no matter your location. Simply print and go to the nearest printer, tap your ID and collect your printing.
PLEASE NOTE: If you are trying to print colour and you go to a 'black and white only' printer, your printout will be in grey-scale.
Are photocopiers included in MyPrint?
- Yes - Where required, all replacement printers are all multi-functional devices that include printing, photocopying and scanning.
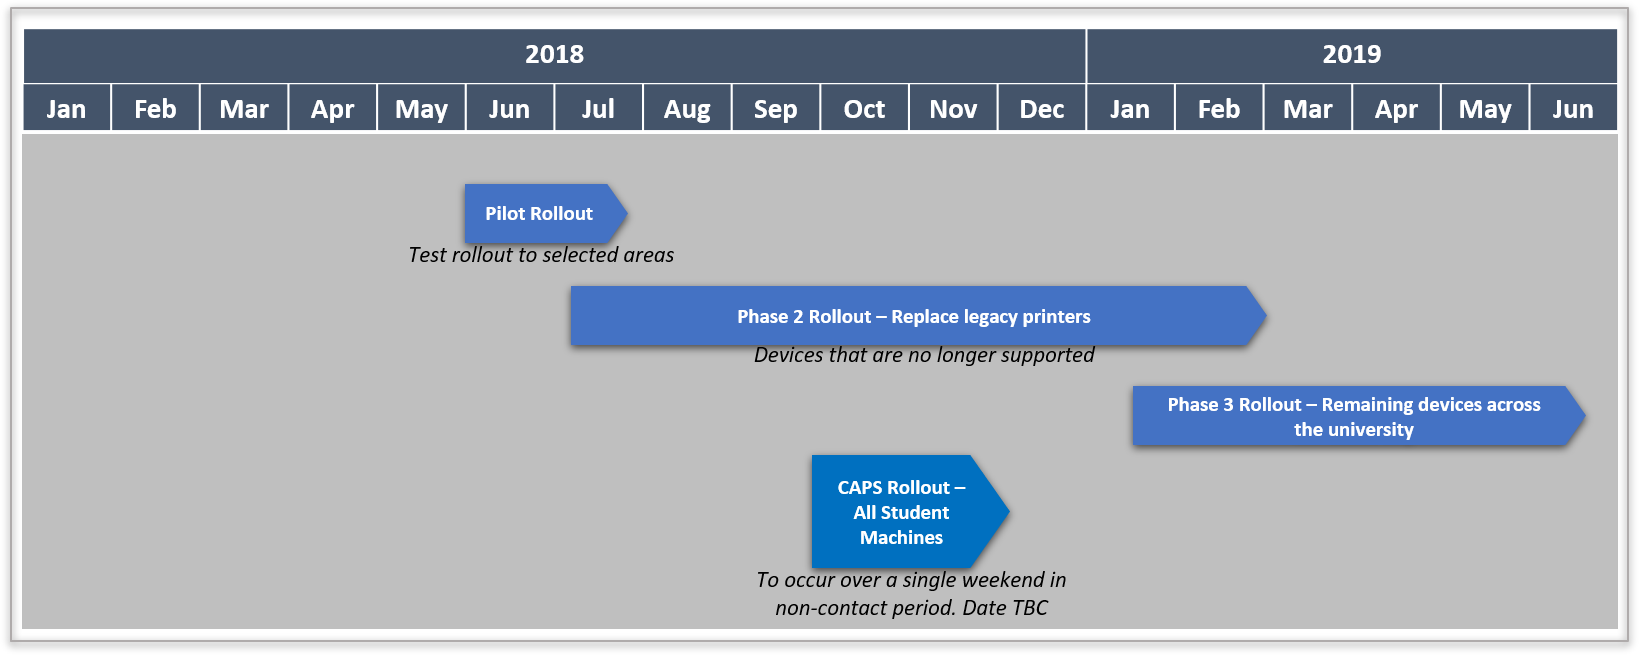
When will staff and student printers be rolled out?
- It is important to note that student printing, including lab printing, is rolling out separately to the staff roll-out. Student printing will be from 17th November 2018 following the completion of exams. This will be communicated extensively closer to the time.
- Please see the image below for an overview of the roll-out schedule.
- 'Phase 2 Rollout' is the replacement of urgent, end of life and end of contract devices. These are no longer supported and therefore treated as a priority. New South Wales locations will also be included in Phase 2.
- 'Phase 3 Rollout' is the replacement of all remaining devices.
- For more detailed building by building roll-out plans for Phase 2 please see the schedules below.
- For Phase 3 buildings a schedule will be finalised by November 2019
- Please note these time frames in the schedules are indicative only and may be brought forward where possible.
Roll-out Schedules
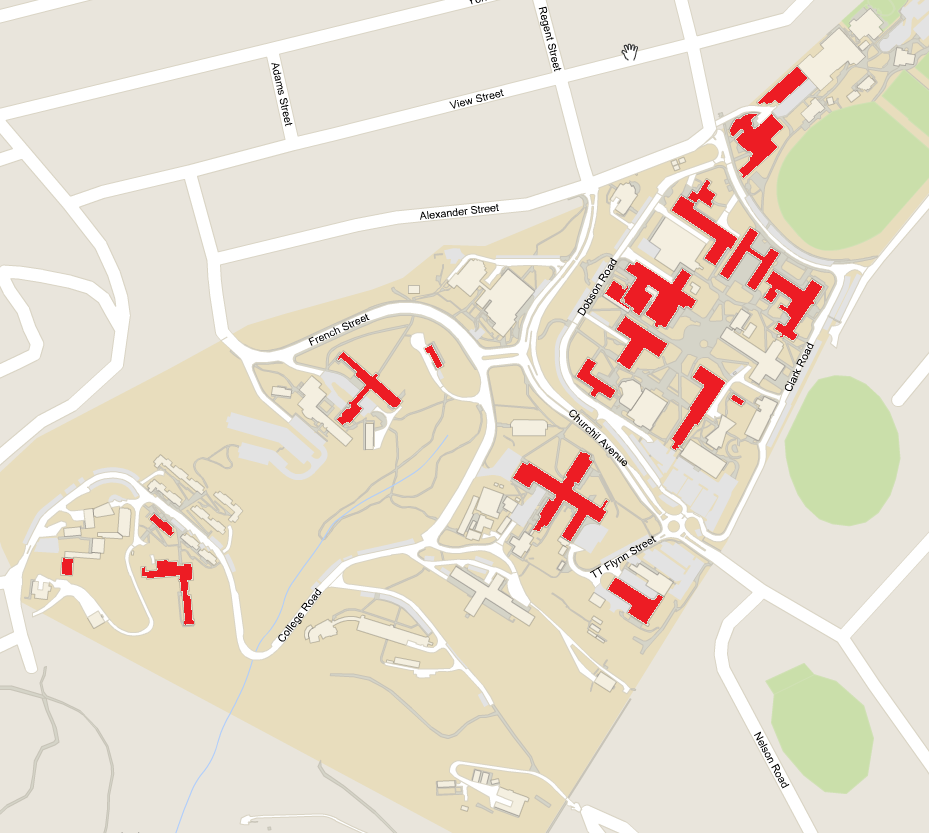
Phase 2 Rollout Schedules
- Sandy Bay Campus Map (PNG 324.1 KB) - Phase 2 Buildings are highlighted in red.
Hobart City and New South Wales (PDF 287.9 KB)
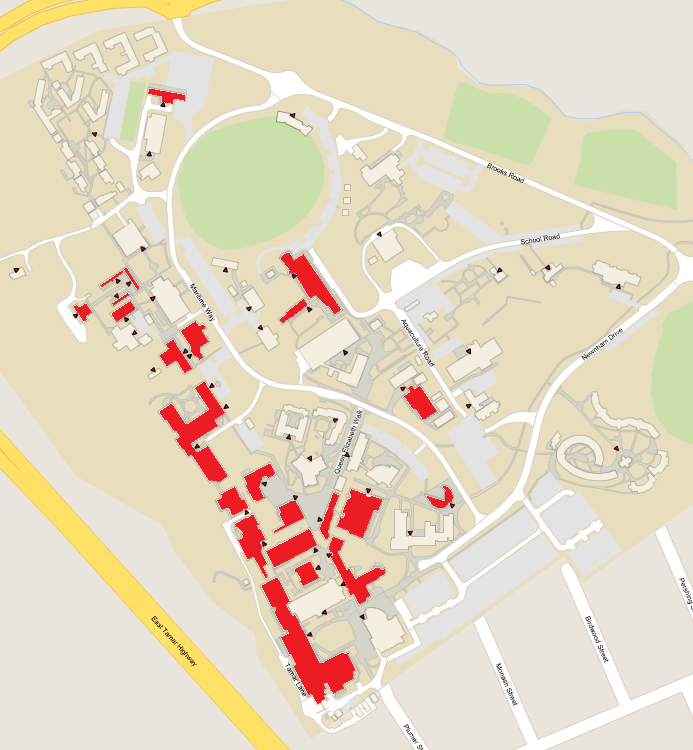
Northern Tasmania (PDF 307.7 KB)
- Newnham Campus Map (PNG 252.5 KB) - Phase 2 Buildings are highlighted in red.
Phase 3 Rollout Schedules
Detailed schedule to be released closer to commencement.
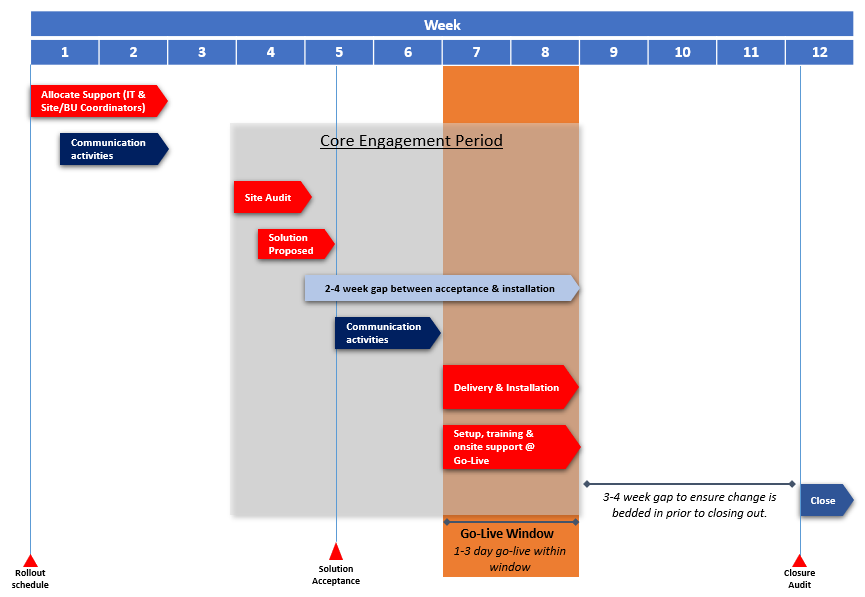
Rollout Process
This process will be followed for each building or roll-out area.
What if I have a printer in my office?
- As part of the new solution there will be an overall reduction in the number of printers across the University. This may mean that personal printers currently in operation will need to be decommissioned.
- This will be assessed on an individual basis however it is expected that the enhanced security features of MyPrint will offset the need to retain personal office printers in most cases.
I require secure printing as my work is extremely confidential and sensitive!
- The follow me print queue feature means that your documents will not print until you physically identify yourself at the printer.
- Essentially, the new solution is far more secure than any of the print models currently available across the University.
I need to print large volumes for my work/research etc. – Will this now be scrutinised more heavily and will I have to justify my printing requirements?
- The Papercut print software allows for greater transparency of printing and tracking of costs.
- Whilst it is a University goal to reduce our carbon footprint from printing, there is no requirement to deviate from what is reasonably required for a persons role or research demands.
Will there be the same number of printers with MyPrint?
- No, the goal is to have an overall reduction in the number of printers by centralising, however this will be offset by advanced features and better security.
Will I have any input into the location or consolidation of printers?
- Yes. As part of the roll-out to each area WINC will be conducting a site audit to gather printing requirements.
- Please contact us if you would like to participate in this process on printservices.project@utas.edu.au
Support and Contacts
WINC Support
Please contact WINC directly for support relating to any MyPrint machines and software.
T: 1300 136 538
E: tas.mps@winc.com.au
Print & Copy Policy
Print & Copy Policy to be provided as soon as finalised.