
MyLO - My Learning Online
Echo360 Browser Capture
Echo360 now provides web or "browser-based" capture, a simplified method of creating a recording using any computer. Browser-based capture can be run on any computer that supports browser use including netbooks, but currently must be run on Chrome.
The requirements for using in-browser capture are:
- You must be online and be in Echo360.
- You must allow access to your computer's camera and microphone when requested.
- You must NOT be using an Incognito window. While in-browser capture may work in incognito mode, if other tabs or browsers are also using it, there may be conflicts that Echo360 cannot provide warnings for through an incognito browser window.
- You MUST be using Chrome (either on Windows or Mac).
To launch in-browser recording
- Enter Echo360 the way you normally do.
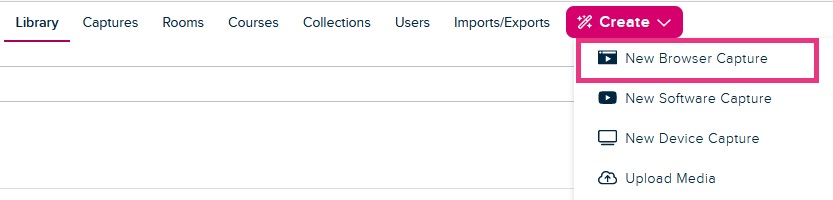
- Click the Create button in the main navigation bar at the top of the screen.
- Select New Browser Capture. This will open in a new tab.
- Your browser will pop up a message asking for permission to access the computer's camera and microphone. Click Allow

- Give the recording a Title
- Publish To: You can publish directly to your own library or to a section . To locate a section just start typing the unit code in the Publish To box.
- Select the Camera, Screen, Microphone inputs that you require. Further information is below regarding input types.
- Click the Camera Options button to open the Virtual Backgrounds drop-down
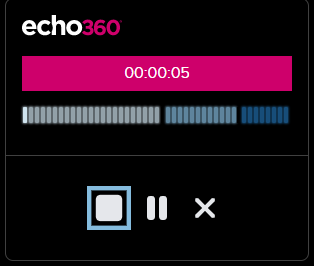
- Click the Record button. This will give a 3 second countdown.

- When you are finished recording, click the Stop button (the square), from the control options. Your other control options include a pause button to pause recording, and an X or cancel button, which cancels recording entirely and discards (permanently) anything recorded to that point. You will see a warning message if you select to cancel.
- The recording immediately stops and begins uploading to your chosen destination.
- When you are finished using the browser capture application, close the tab to exit.
Allowing Access to Camera and Microphone
In the event that your browser does not present you with a popup for camera/microphone access, OR like many people, out of habit you race to the Block button, click the Lock icon located on the left side of the URL address bar, as shown below. The drop-down box that appears should provide options for the camera and microphone that you can enable if necessary.

Recording inputs and options
Camera input
If your computer does not have a built-in camera or an externally attached (USB or other) camera, you can skip this section. Leave the Camera setting at None and move on.
Most laptops, however, do come with a built-in camera, and you may have an external camera attached.
Use the Camera drop-down list to select the camera input you want to use. A preview of what the camera will record appears on the screen.
Screen input
The screen input option lets you determine what, if any, display items you want to include in your recording. Click Add Screen on the right, and a dialog box appears with three options, shown and described below.
- Entire screen - The Entire Screen option allows you to select a display screen and record everything that occurs on the screen during the recording. If you happen to have multiple monitors, you can select WHICH monitor's screen to use for the recording. Remember that EVERYTHING on the screen will be captured in the recording if you select this option.
- Window - The Window option allows you to select a particular application window and record everything that occurs within that application window. The application must already be open on the computer so that the Browser Capture program knows it is available to select. If necessary, minimize the browser you are using for in-browser capture, then find and open the application you want.
- Chrome Tab - This option allows you to select a tab of the browser in which you have in-browser capture running, in order to record all activity that occurs in that tab. The tab you want to use must already be open in order to select it.
You cannot select a tab from a different browser; you can only use currently open tabs for the browser where the in-browser capture application is running. If you need to use a different browser, open that browser and use the Window option described above. When you select a tab, a preview of the contents of the tab appears in the Screen share selection pop-up
Microphone
The Microphone recording options include both a drop-down list with sound input options available as well as a sound level bar located immediately above the drop-down list.
As you make different selections, you can speak or make other noises to ensure that the selected input is working and is able to discern the sound.