
MyLO - My Learning Online
Padlet: Tips and Tricks
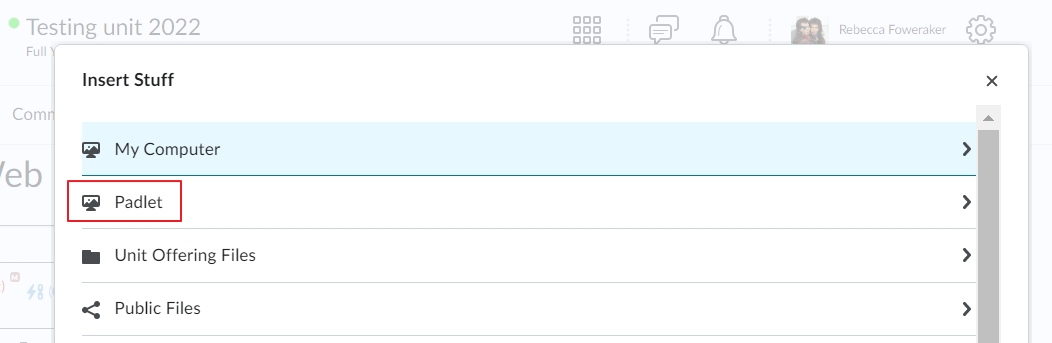
Staff role creation within Padlet
Creation of an Author account within Padlet is done the first time you select to add a Padlet to your unit via Insert stuff or via Existing activities within content in a unit you are teaching in.
Pressing on this link will allow you to then open Padlet up in the dashboard.
Your account will be created and you should now be able to access Padlet via your UTAS credentials: https://mylo.padlet.org
How to create a Padlet
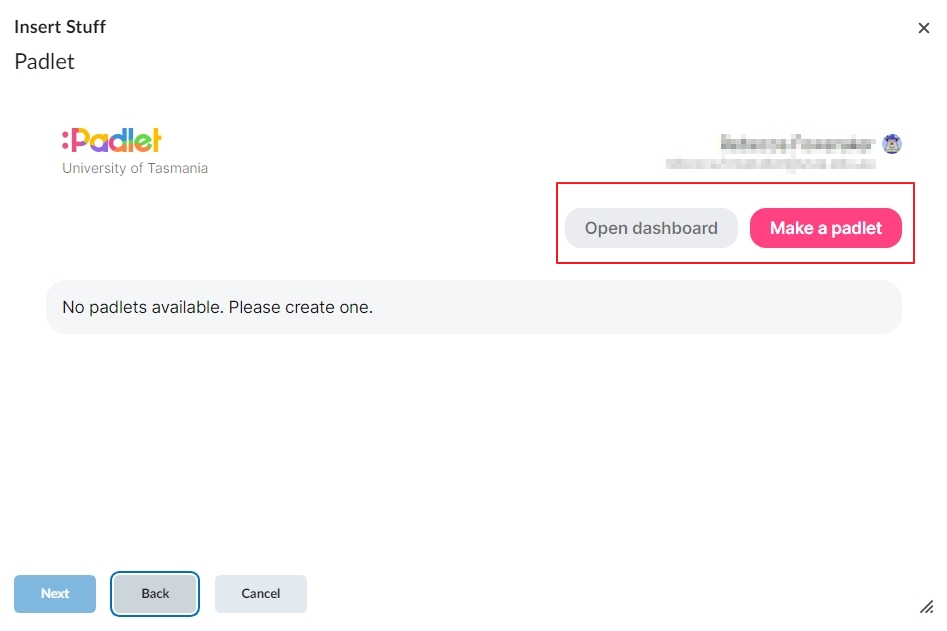
To access the Padlet Dashboard Select either Insert Stuff from any tool that allows you to access HTML, or go to Content in your unit and select Padlet from Existing Activities. The below example is from the point of view of Insert Stuff.
To create a new Padlet select Make a Padlet.
Press on Make a Padlet

Select the type of Padlet you wish to use.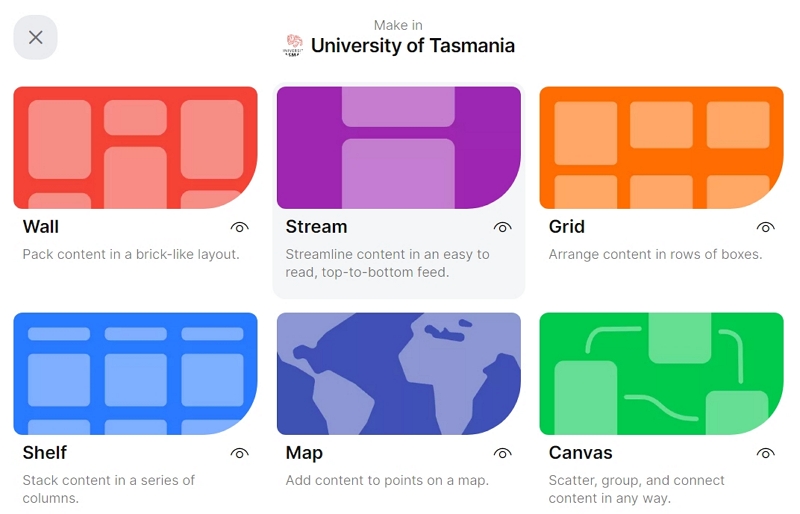
Add a title and description to your Padlet.
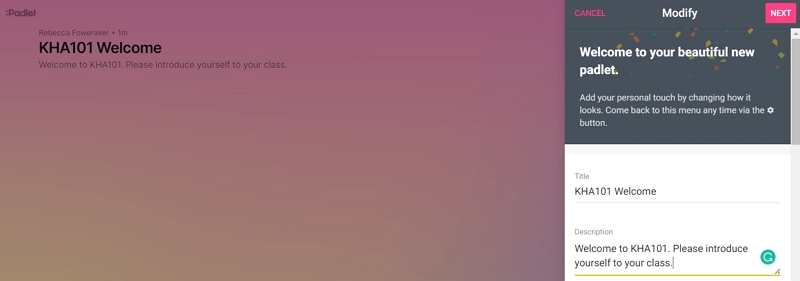
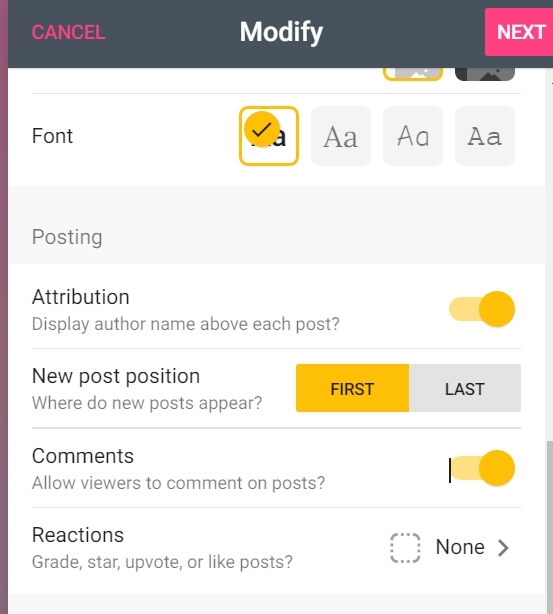
Configure other settings such as font, Attribution, ability to add comments and wall theme.
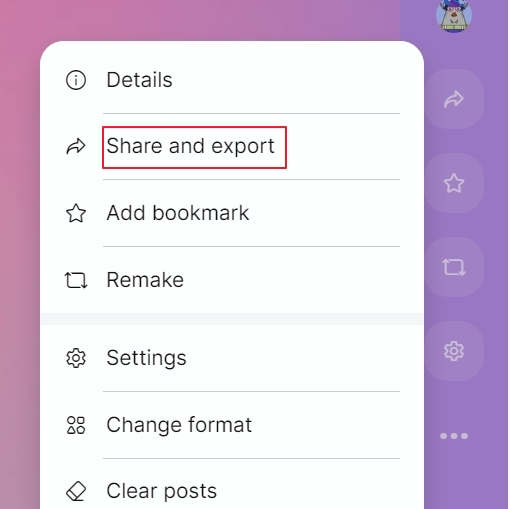
Once saved press on the three dots in the right-hand corner to open other essential settings.
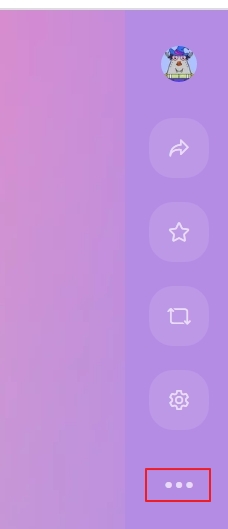
Press on Share and export.
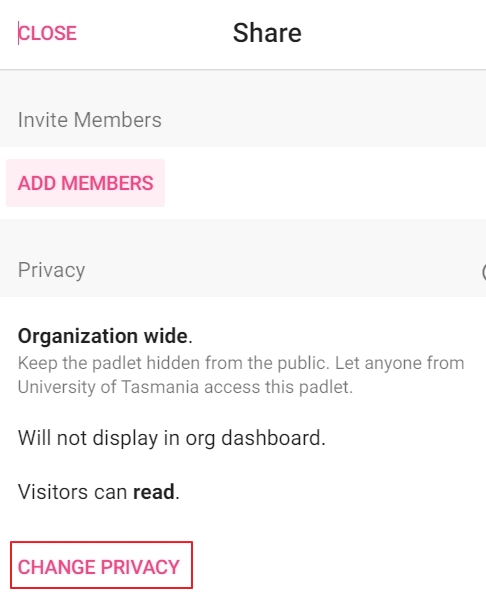
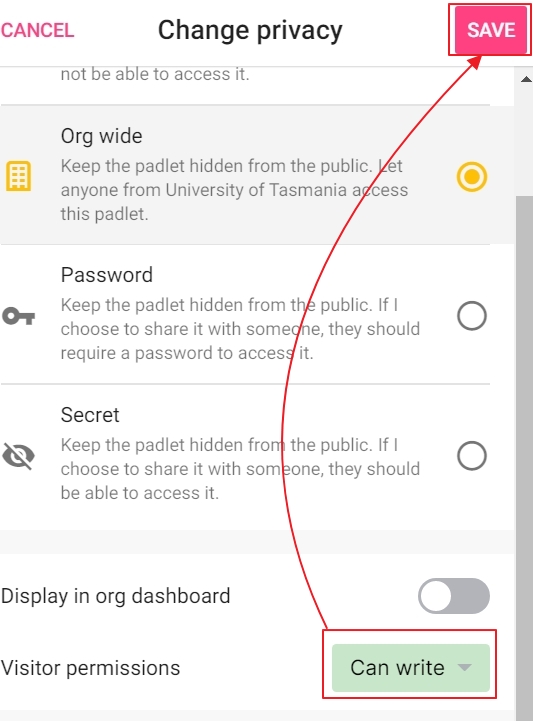
Change the Privacy settings from Visitors can Read to Visitors can Write in order to allow students to add posts to the Padlet.
Press Save.
Your Padlet can now be added to your unit content.
How do I add a post to a Padlet?
- Double-click or click the add (+) button of the padlet.

- Add a title and some text. Tap Publish to post.
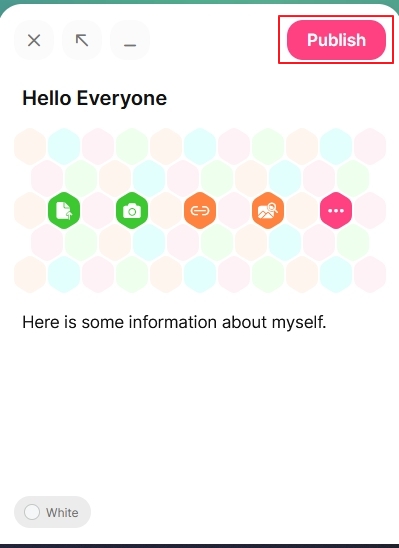
You can also add media files to your post. Some of the attachment options include images, documents, links, videos, and drawings. You can even use your webcam or device microphone to record a video or sound file.
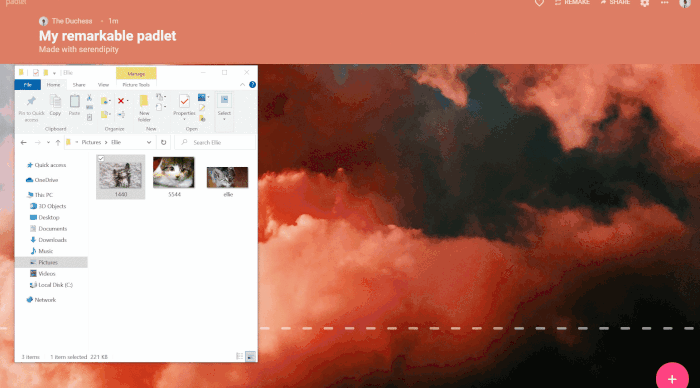
How to add files or images to a Padlet post
Click the + button on the Padlet to add your post. You will then have the option to add content to your post. There are five icons for you to choose from, these allow you to either upload a file, add a link, search the web for content, or take a picture. Clicking the three ellipses opens additional options to add content to your post. You can also drag and drop files onto a Padlet to add multiple items all at once.
 ="">
="">
How to access the Padlet Dashboard
To access the Padlet Dashboard when you have not yet created a Padlet select either Insert Stuff from any tool that allows you to access HTML, or go to Content in your unit and select Padlet from Existing Activities. The below example is from the point of view of Insert Stuff.
Press on Open Dashboard.
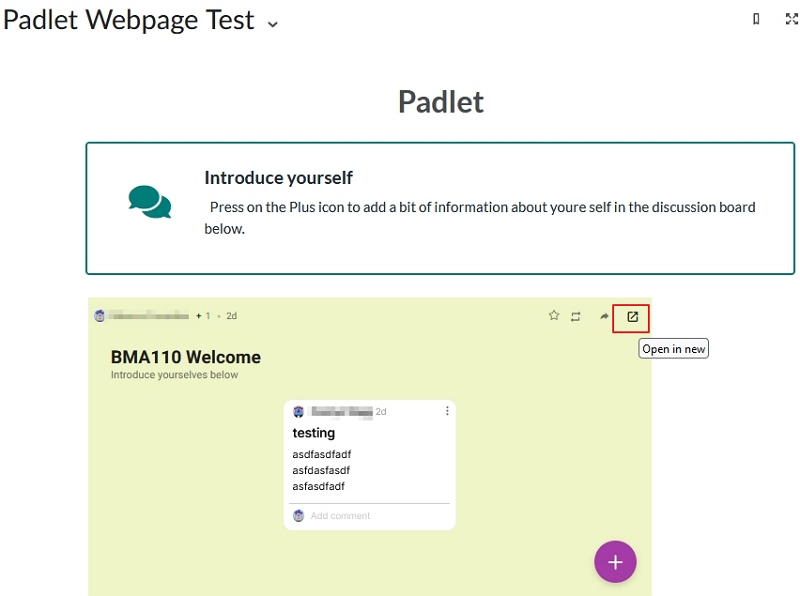
If you have a Padlet already created and added to your webpage you can access the Dashboard from there. In order to authenticate press on the icon to open the padlet in a new window.
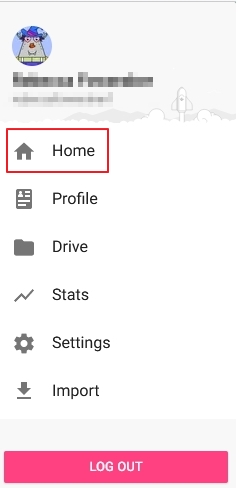
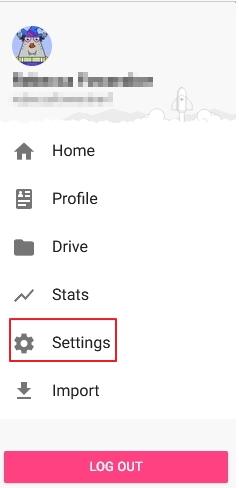
To access the dashboard select Home from under your avatar, or press on padlet in the lefthand corner.
How to make changes to your template in Padlet
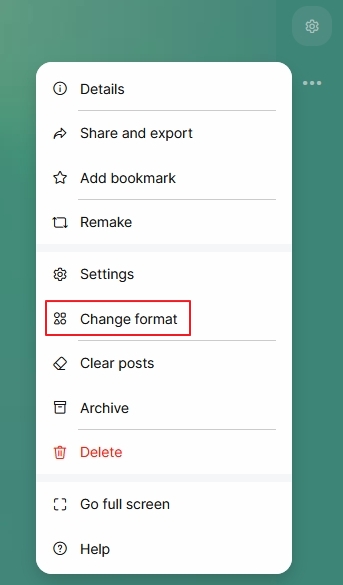
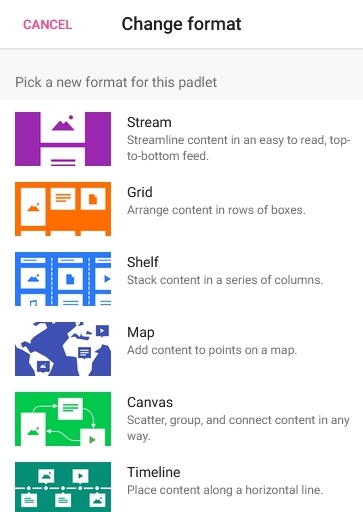
If you want to see what your Padlet will look like in one of the other Padlet formats. Open the Padlet you want to change, click the ellipses in the top right and choose Change Format from the drop-down menu that appears. You will then be given the option to choose the other format styles. Your Padlet may go blank whilst it works to convert the format and it can take a few moments for the new format style to appear.
Choose your new format:
How do I make changes to the design or description of my Padlet?
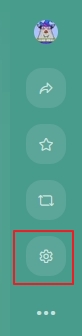
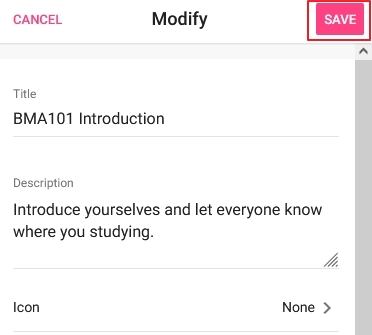
Open the Padlet and click on the Cog in the top right-hand corner, this will open the Modify menu options.
From here you can rename your Padlet, change its description, its appearance, and the post settings, which define how users can engage with your Padlet. Press Save to update the details.
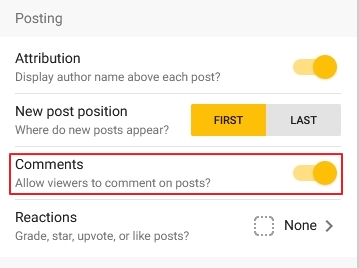
How to enable comments on your Padlet
Comments are useful for when you want your students to react to a post with text on your Padlet.
You can turn this setting on and off in the Modify menu or when you create a new Padlet.
Turn on the ability to add comments and press Save.
How to change your Padlet avatar
Click your Padlet avatar image in the top right-hand corner of your Padlet dashboard (when using a PC), this will open the account settings drop-down. From here, choose Settings.
You will then see the option to change your avatar image and add a biography.

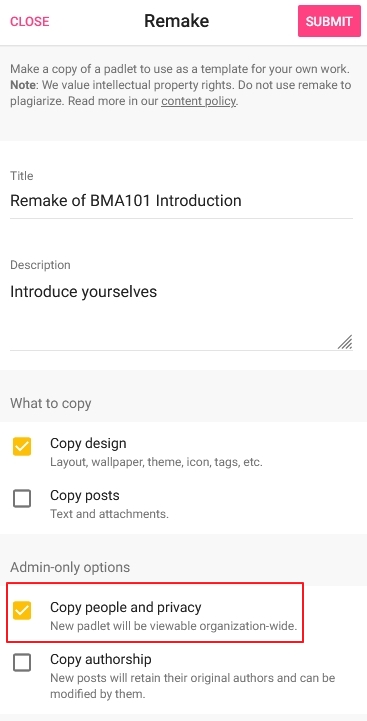
How to remake an existing Padlet
Once a Padlet wall has been set up for an activity, it is very easy to remake (clone) Padlets, to then edit and reuse.
- Open the existing Padlet that you want to clone.
- Click on Remake in the top right corner of Padlet.
- Select the relevant options to copy:
- Copy design (layout, wallpaper, activity title and description) and
- Copy people and privacy (privacy and read/write settings).
- Modify the title (and description if needed to adjust the context)
- Check that the Privacy settings under Share are set to the correct write/read permissions. Students will be unable to post if this is not set to ‘write’.
Note: Choose the ‘Copy people and privacy’ option so that you copy the same format as the original, including ‘secret’ privacy setting and the visitor read/write permissions. Otherwise, default remade walls the Visitor Permissions are set to ‘read-only and must be manually changed.
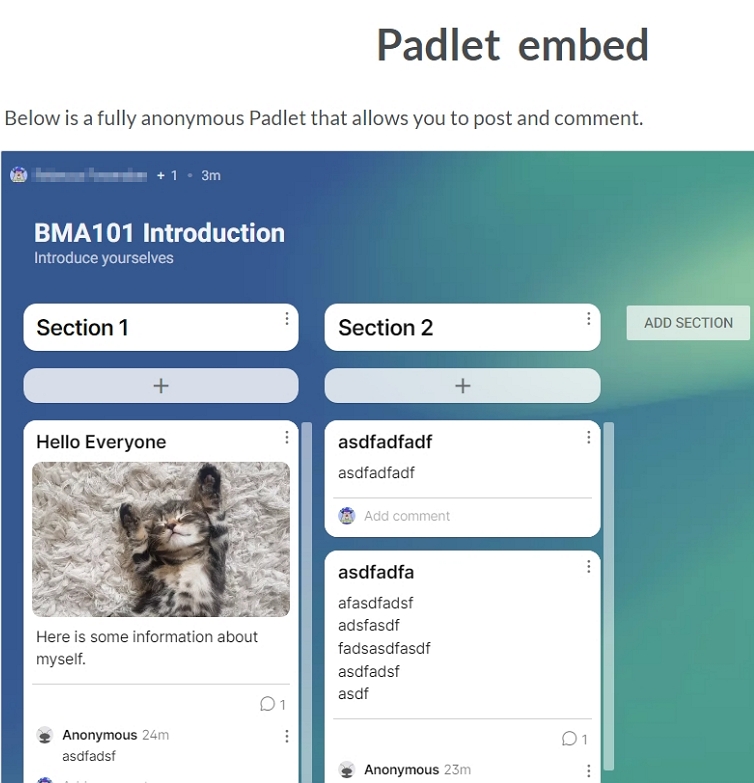
How to add an anonymous Padlet to your unit
There are two ways to ensure anonymity within Padlet.
1. When creating your Padlet ensure that the two options are unselected:
- Attribution - This displays the student's name
- Comments are turned off - if comments are on the name will appear.
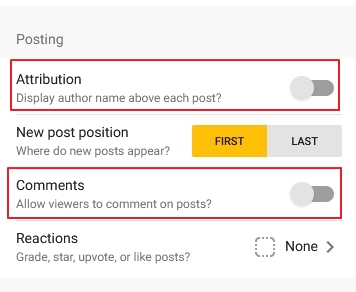
These settings are available via the Modify cog wheel.
If you wish for comments to be made by your students on posts these are the steps required to make sure all users are anonymous.
2. When creating your Padlet ensure that these two options are set up:
- Attribution - This displays the student's name - turned off
- Comments are turned on.
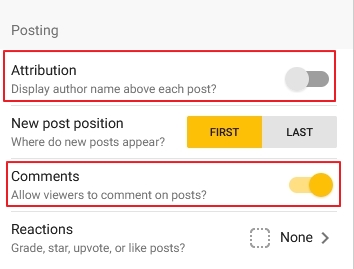
Press Save.
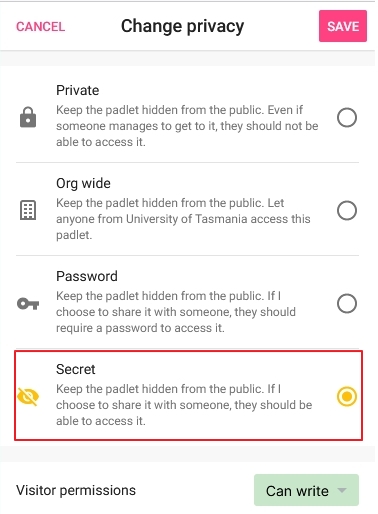
Select Sharing and press Change Privacy.
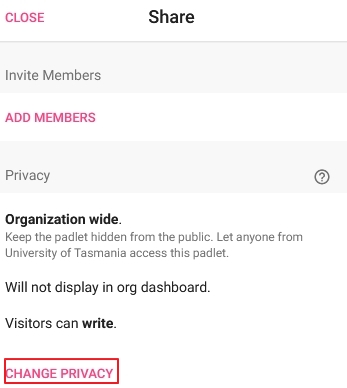
Choose the Secret Option and Save.
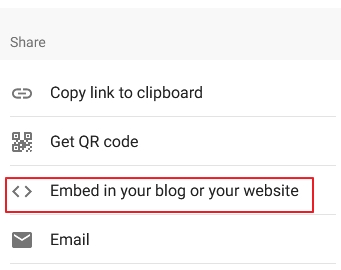
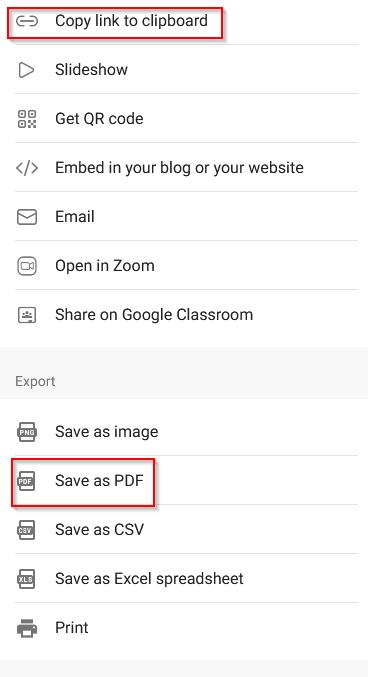
While still on the Share screen, select Embed in your blog or your website:
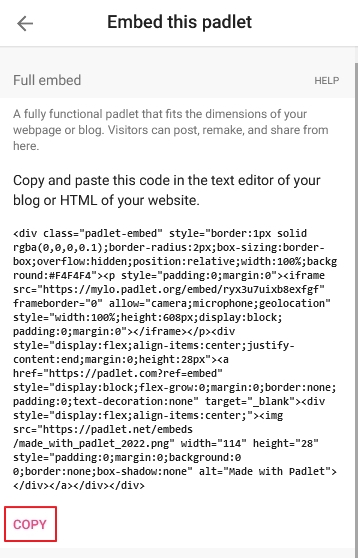
Choose the Full embed option and press on Copy to make a copy of the code.
Edit your MyLO webpage within your unit. Press on Insert stuff and choose to Enter Embed code, or use the Other Embed option with MyLO Mate.
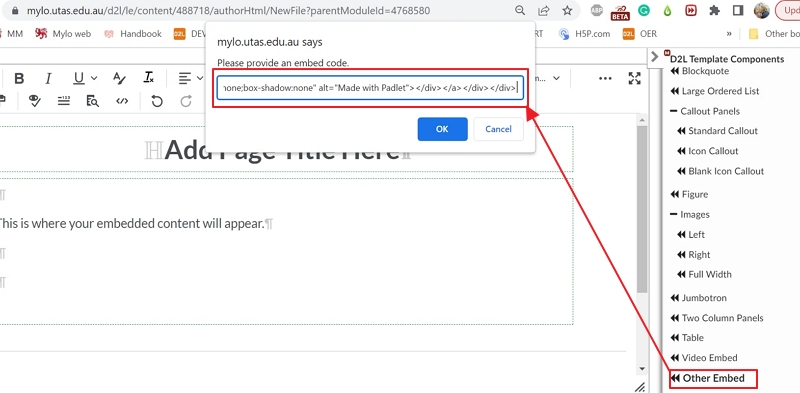
Paste your copied code in and press OK. Save your changes. Your Padlet will now be anonymous to those who post and comment.
Padlet redelivery in MyLO
If you are coordinating a unit that has some existing Padlets embedded within content pages, you will need to remake them yourself to be used in your new unit offering.
There is a three step process to remake your Padlet:
- Freeze the Padlet from your previous offering.
- Re-Make your new Padlet
- Insert the Padlet into your MyLO content page.
Freezing a Padlet at the end of Semester:
Once the semester has ended it is essential to freeze any Padlets you have used. This is to ensure that past students cannot change content, and it remains a fixed record of their participation. To do this open the Padlet
Select the three dots on your Padlet Settings:

Choose the Freeze Padlet option from the list.
Once selected no new posts can be added. Existing posts cannot be edited or removed. No-one is able to comment and further settings are unable to be modified. You can choose to unfreeze your Padlet at any time.
Note: Only the creator of the Padlet is able to freeze it.
Recreate your unit Padlet:
A guide on how to remake your Padlet is found here.
Embed your Padlet within your content page:
Edit the MyLO content page & delete the old Padlet from the page.
Press on Insert Stuff and choose Padlet:

Select your remade Padlet to embed and press Insert:

Save your page.
How to stop your students from posting
When you no longer want your students to post or comment on a Padlet in your unit you have two options.
The first option is to Freeze your Padlet:
Select the three dots on your Padlet Settings:
Choose the Freeze Padlet option from the list.
Once selected no new posts can be added. Existing posts cannot be edited or removed. No-one is able to comment and further settings are unable to be modified. You can choose to unfreeze your Padlet at any time.

You can schedule your padlet to be frozen up-to a year in advance.
The second options requires you to change the privacy settings of the Padlet.
To change the visitor privacy settings to read-only instead of write. Go to your Padlet and select Share Settings.

From Visitor Permissions choose Reader, rather than Writer.

Visitors can access the Padlet and read posts. Visitors can still add comments to posts, but are unable to create new posts.
Adding a Poll to your Padlet
How polls work
On Padlet, polls are interactive attachments. To add a poll to a padlet, open up the post composer and select the Poll option from the content picker.
Add your question, add your choices, select post, and let the people decide. Anyone with access to the padlet will be able to vote.
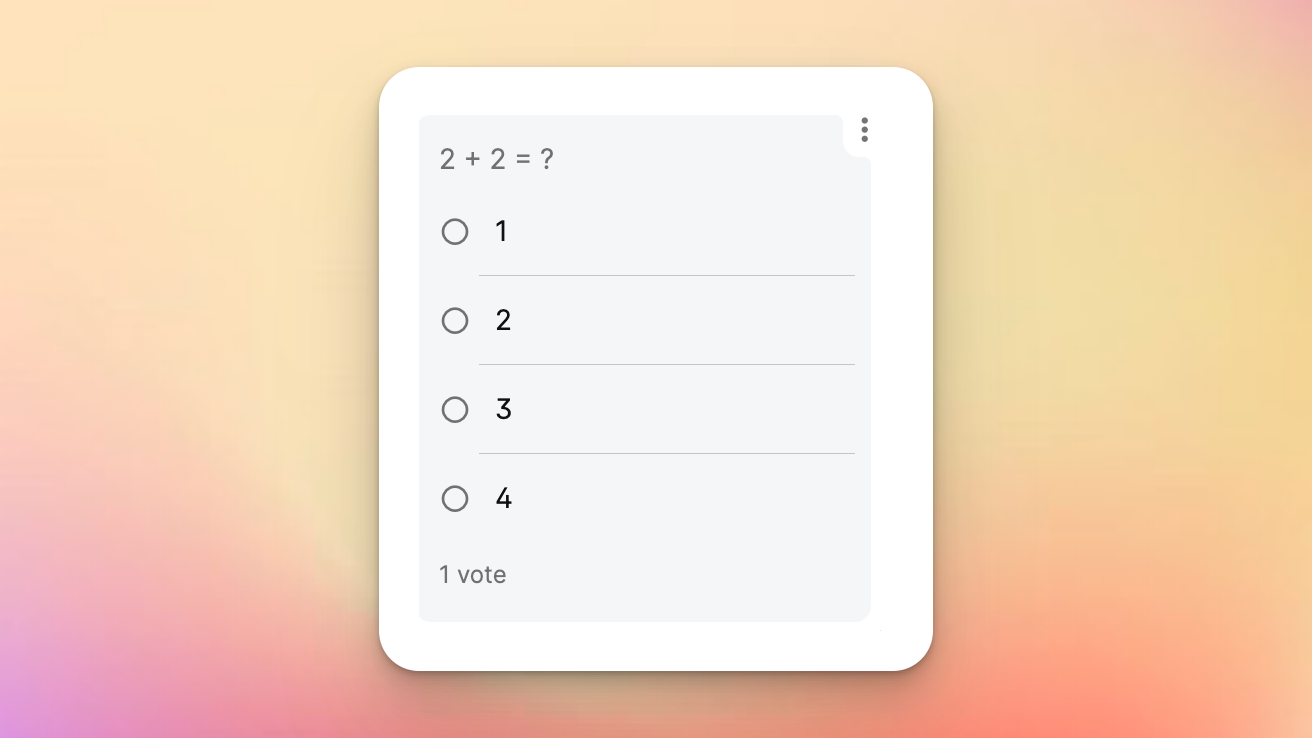
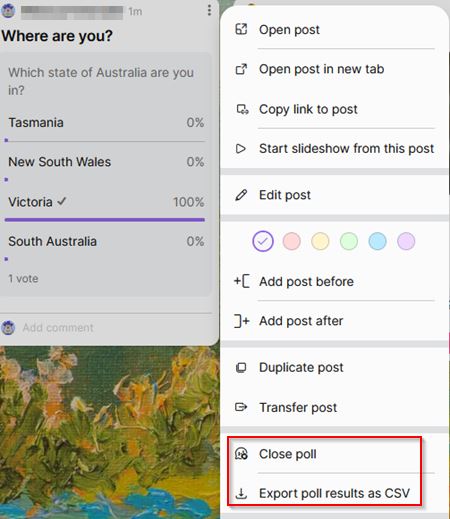
Anyone can see the result of the poll after voting. The creator and any admins will be able to see the breakdown of votes before voting. Results will update in real time.
The poll can be closed at any time by the creator or any admin of the padlet. The post with the poll can be edited after posting, but the poll cannot be edited after posting.
You can close the poll and export the results as seen below.
Scheduling a Post
How to schedule a post
To schedule a post, create it as you normally would. Instead of publishing immediately, pick a date. You can choose any time in the next year.
When the time comes, your post will publish at the time stated.
How to create Separate Padlets for your Students
It is possible to create a separate Padlet for each student within your unit. Each Padlet is then viewable only to that student. Staff can view the Padlets within their Padlet Dashboard if they are the creator of the Padlet or the student shares the Padlet with them.
To create a Padlet for each student it is advisable to first create your Padlet in your dashboard.
- Go to Content/ Existing Activities/ Padlet.
- Tick the option to Create a copy for each user and select your created Padlet.
- A link will be created within your content.
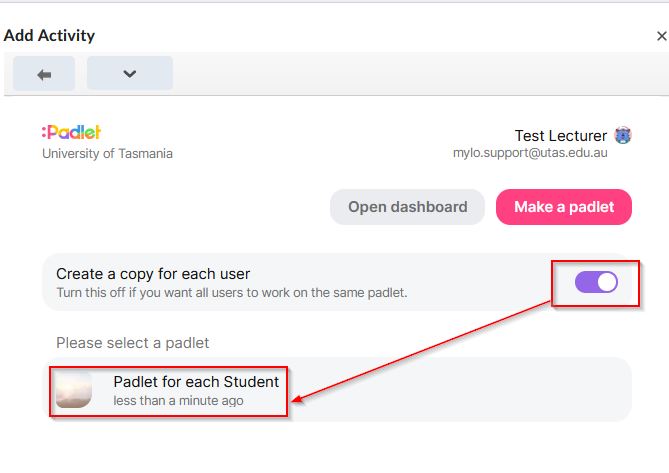
Each student that presses on the link within content will have their own separate Padlet to work on.
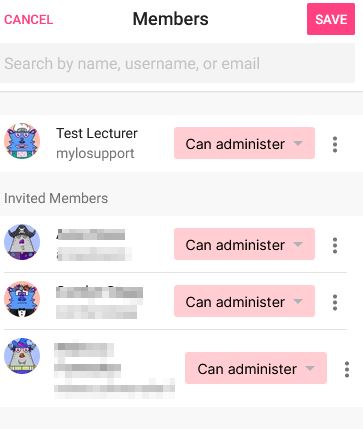
Other than the student, the only other user to automatically have access to the Padlet is the creator of the Padlet. If you need other staff members to have access to the Padlet you can add these members to the Padlet before adding the link in your unit. If this step is not done then the student will need to add these users manually. To do this they can press on Share in the right hand side of the Padlet
![]()
Here they can see the users who currently have access. Press Add to add other users.
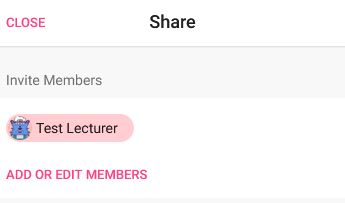
The student can search for users by email or username. An email will be sent to these users inviting them to access the Padlet.
If it is a requirement for the Padlet to be graded within MyLO it is suggested that you create an assignment folder for this purpose. The student can then either copy the link or save their Padlet as a PDF or Image to upload into an Assignment folder for marking.
Re-Make Padlet Links
This option will allow you to share a link that automatically generates a remake of your padlet.
Auto-remake links create a copy of your padlet on the recipient’s account
Every padlet now allows you to enable an auto-remake link. When someone clicks an auto-remake link you’ve shared, they’re directed to a remake of your original padlet on their account.
More information on this option within padlet is here:
https://padlet.blog/auto-remake-links/

Padlet Automations
How automations work
Automations have two components: a trigger and an action. The trigger is what starts the automation, and the action is what happens as a result.
The first set of automations is very simple. It has one trigger, time, and two actions, freeze and unfreeze. So, you can schedule a padlet to freeze, and you can schedule a padlet to unfreeze.
Accessing the automation panel
To add an automation to your padlet, click the three dots to open the additional padlet actions menu. Then click automations. Only admins of a padlet can schedule automations.

More information on Padlet Automations can be found here: https://padlet.blog/automations/
How to post Videos on a Padlet
Padlet allows you to post videos from your device, webcam or the internet. Here's how:
Create a new post
- Any video posted to a board must be added through a post.
- Begin by setting up a new post on your board by clicking the (+) button in the bottom-right corner, double-clicking anywhere on the board, or tapping 'C' on your keyboard.
Upload a video from your device
Boards
- To post a video that is stored on your device, click the File Upload icon on the left side of the post composer.

- Clicking this icon will open a new window where you can select the desired file from your device.
- You can also drag and drop a file from your desktop onto the post composer.
- Once the file loads in your post, click Publish to complete the post.
Sandbox
- To post a video that is stored on your device, click the File Upload icon on the right side of your screen. Note if many tools are being used within your Sandbox, you may need to open these up first.


- Clicking this icon will open a new window where you can select the desired file from your device.
- You can also drag and drop a file from your computer into your Sandbox.
- The file will automatically post to your Sandbox after a few moments.
Record a video with Video Booth
Boards
To record a video with Video Booth, click the button on the right side of the post composer window.
- This will open a new window with lots of options for attachment uploads. Click the Video Recorder button.

- This will open your webcam. You may have to allow permission for your browser to access your webcam and microphone.
- Use your webcam to take a video that will show up in your post. A number of avatars are available to use.

- Once you're done recording, click Next.
- Review your creation and then choose Save.
- Remember to click Publish to complete the post.
More information can be found here: https://padlet.help/l/en/article/drmkz03rmn-post-videos-on-a-padlet
Padlet Content Moderation Options
There are three basic levels of Content Moderation: None, Auto, and Manual. As our organisation has an account with student accounts, we have an additional option in which only posts by student accounts are moderated. You can access these from your padlet's settings.

Moderation levels
None: All posts will be published instantly on the padlet without moderation.
Auto: Posts detected as inappropriate by our Safety Net AI moderation system will be flagged for approval. Posts deemed inappropriate will be blocked, and an email notification will be sent to the owner of the padlet. The owner can decide whether to accept or reject the post.
Manual - Students only: All posts added by students are submitted for review. The owner and admins of the padlet will be able to see and approve submitted posts.
Manual - All: All posts are submitted for review. The owner and admins of the padlet will be able to see and approve submitted posts.
More information can be found here: https://padlet.help/l/en/article/v6iz7bhhl1-turn-on-content-moderation
Padlet Analytics
Analytics for your padlets
Open any padlet board or sandbox, click the three dots in the action bar, and select "Details." At the bottom, you'll find your padlet's analytics: total views, unique visitors, and engagement time. The data updates roughly every minute to give you a current picture of your padlet's impact.

What these numbers mean
Views show how many times your padlet has been visited, while visitors tell you how many unique visitors have viewed your content. Engagement time will show how much time everyone has spent looking at your padlet.
If you've created a padlet for your unit, you can see not just how many times it's been accessed but how many students have actually viewed it. Padlet count these metrics in a privacy-friendly way without tracking individual users, giving you valuable insights while respecting privacy.

More information can be found here: https://padlet.help/l/en/article/sldcgxy90e-get-info-about-a-padlet