
There are three ways to style the storyboard:
Note: Click on the relevant image below for more information and examples on how to use each style.
Style tool in Word
The D2M Word template utilises the Styles tool in Word. See below a list of different actions and styling using different pre-set styles work.
Note: These styles have been custom created for the D2M template, they cannot be found in a standard Word document. If content has been built in another Word document, it will need to be copy and pasted into a D2M template.


This style is used to name the module. This will appear as the module name in MyLO as well as the corresponding folder in Manage Files. This style can only be used once per document. If multiple modules are needed, create one document per module.

This is used in two areas.
- The name of the webpage in the module
- The top page title of the page.
Every time the Page Title style is used in the storyboard, it will start a new webpage. Consider labelling this in a sequential manner so that it is clear where the user is e.g. 1.1, 1.2 etc.
The text will be formatted with the H1, it will be aligned to the centre of the page.

Use this each time you introduce a new topic area or content area within the same webpage.
The text will be formatted with the H2 style (coloured heading), it will be aligned to the centre of the page.

Use this each time you introduce a sub-topic under the content heading.
The text will be formatted with the H3 style, it will be aligned to the centre of the page.

Lead text works the same as the Lead Text within MyLO. It is used for the first paragraph of text on a page if required.
The text will be formatted to be MyLO Lead text format, aligned to the left.

Block Quote acts as the first half of the Block Quote in MyLO. It will format the quote to be bold and italicised. To cite the quote, you will need to use the caption text style.
The text will be formatted to be bold, italicised and aligned to the left.

Use this style anytime you want to caption, cite or list the source of an object within the page.
The text will be formatted to be italicised, aligned to the right with a horizontal line above.

This style is designed to be used any time you have a heading in a component. This style will only work within an object (see tabled objects), it will load as normal text if added outside of an object.
The text will be formatted with the H5 style, aligned to the left.
Table based objects
The second way that content can be styled is to put the content in custom styled tables. This tells D2M how to display the content in MyLO.

Create a table that has one column and two rows.
- Row 1: Type the name of the icon to appear in the callout box
- Row 2: Enter the content to appear in the callout box
Considerations
- The heading text will need to be styled with the Callout Title style
Below is a list of the icons and the text to be used to make them display in the callout box.
| Icon | Text |
|---|---|
| Blank (no icon) | Callout |
| Assessment | |
| Case Study | |
| Face to Face Activity | |
| Group Activity | |
| Group Discussion | |
| Hyperlink | |
| Important Info |
| Intended Learning Outcomes | |
| Media | |
| Practical Task | |
| Quiz | |
| Reading Task |
| Reflection Activity |
| Written Task |
Example
| Reading Task |
| Callout Heading Callout content |

Create a table that has one column and four rows.
- Row 1: Type Image and then alignment
- Image Left
- Image Right
- Image (this will centre the image)
- Row 2: Insert the image
- Row 3: Enter the alt text for the image
- Row 4: Enter the source for the image
Considerations
- It is recommended that you compress the image using Word's compress image feature to make the image load quicker in MyLO
- The suggested image sizes are 300px X 300px or 1170px width
- Text after an image will be wrapped
Example
| Image left |
|
| University of Tasmania logo |
| https://universitytasmania.sharepoint.com/sites/marketing/SitePages/Marketing-Download.aspx#logos |


Create a table that has one column and two rows.
- Row 1: Type Jumbotron
- Row 2: Enter the text for the Jumbotron
Considerations
- The heading text will need to be styled with the Callout Title style
Example
| Jumbotron |
| Jumbotron Heading Jumbotron content |

Create a table that has two columns.
- Row 1: Type Panels
- Row 2: Enter the text for the panel in each cell
Considerations
- The heading text will need to be styled with the Callout Title style
- You can create as many rows as needed, subsequent rows will additional panels
Example
| Panels | |
| Panel 1 Heading Panel 1 Content | Panel 2 Heading Panel 2 Content |

Any table that does not have an allocated function e.g. Jumbotron, will display as a table in MyLO. The first row of the table will display as a header row.
Tables will automatically format to be 100% width and responsive.
Example
| Heading 1 | Heading 2 | Heading 3 | Heading 4 |
| Content | Content | Content | Content |
| Content | Content | Content | Content |
| Content | Content | Content | Content |
| Content | Content | Content | Content |

Create a table that has two columns.
- Row 1: Type Accordion
- Row 2: The left cell will be the accordion heading and the right cell will be the content of the accordion.
Considerations
- The heading text will need to be styled with the Callout Title style
- You can create as many rows as needed, subsequent rows will additional accordions
Example
| Accordion | |
| Heading 1 | Content under Heading 1 |
| Heading 2 | Content under Heading 2 |

Create a table that has two columns.
- Row 1: Type Tabs
- Row 2: The left cell will be the Tab heading and the right cell will be the content of the tab.
Considerations
- The heading text will need to be styled with the Callout Title style
- You can create as many rows as needed, subsequent rows will additional tabs
Example
| Tabs | |
| Heading 1 | Content under Heading 1 |
| Heading 2 | Content under Heading 2 |

Where interactive content needs to be added to the storyboard so that it can be built but does not need to be imported as text into MyLO, build it into an interactive table. Any content in this table will not be imported to MyLO. Instead, a red text placeholder will appear.
Create a table with one column and two rows.
- Row 1: Type H5P or Interactive
- Row 2: Include instructions and content for the interactive content.
Example
| Interactive |
| Any content written here will not appear in MyLO. Instead, red place holder text that will easily identifiable in MyLO to update . |
Standard formatting
Additionally, some of the basic standard formatting from Word will come across as designed. However, extra formatting such as different fonts and text colours will not import.

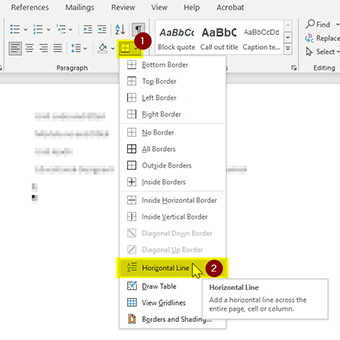
Insert a horizontal line in Word, it will import as a horizontal line in MyLO.
To insert a horizontal line, click the down arrow to the right of the border tool and select horizontal line.
The following formatting will import as it appears in Word:
- Unordered lists (bullet points)
- Ordered lists
- Bold
- Italics
- Underline
- Hyperlinks
Any YouTube or TED Talk link that is added in the storyboard will automatically be converted to an embedded video. It will include a link under the embedded video where users can navigate to YouTube or Ted Talk to watch the video.

Currently, there is no supported way to pre-format large ordered lists, this will need to be completed once the content has been imported into MyLO.